Hydroponics/Aeroponics Kit
This kit includes the following components permanently mounted onto a PCB. All connections are made through the use of screw-terminals.
| Measures | Hardware |
|---|---|
| nutrient level | Isolated - mod-EC - Industrial EC Probe |
| pH | Isolated - mod-pH - Industrial pH Probe |
| Temperature | mod-NTC - Industrial EC Probe NTC |
| Pin | Function |
|---|---|
| GND | Ground for the board |
| VIN | 3.3-5.0 volt power supply |
| SDA | Data line for I²C interface |
| SCL | Clock line for I²C interface |
| 1W optional | 1-Wire signal |
| EN optional | ENable pin, LOW to enable, HIGH to disable modules |
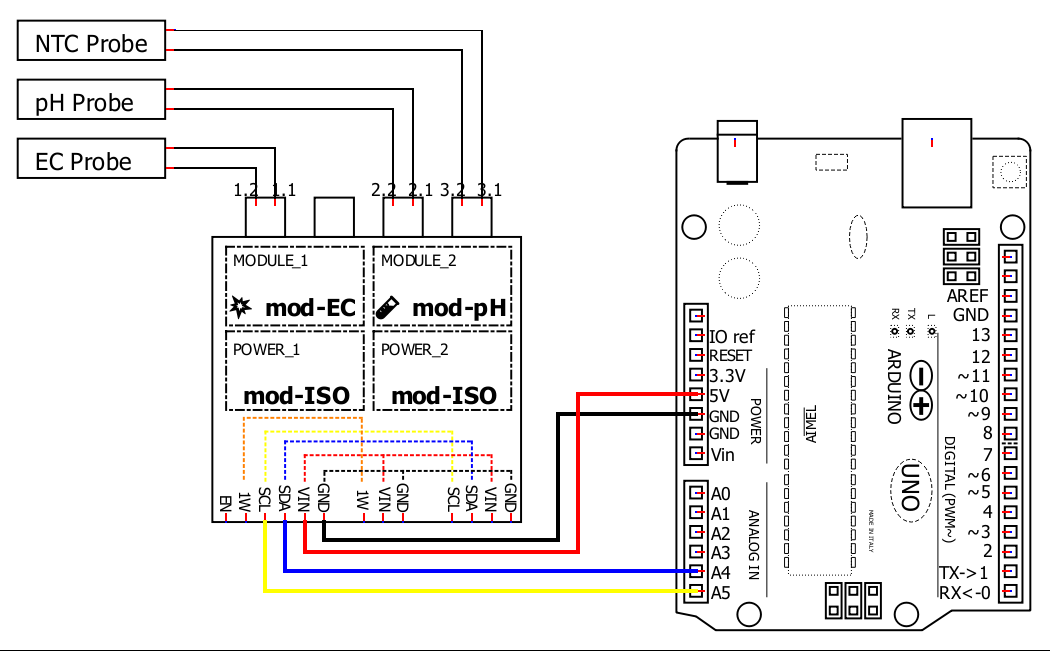
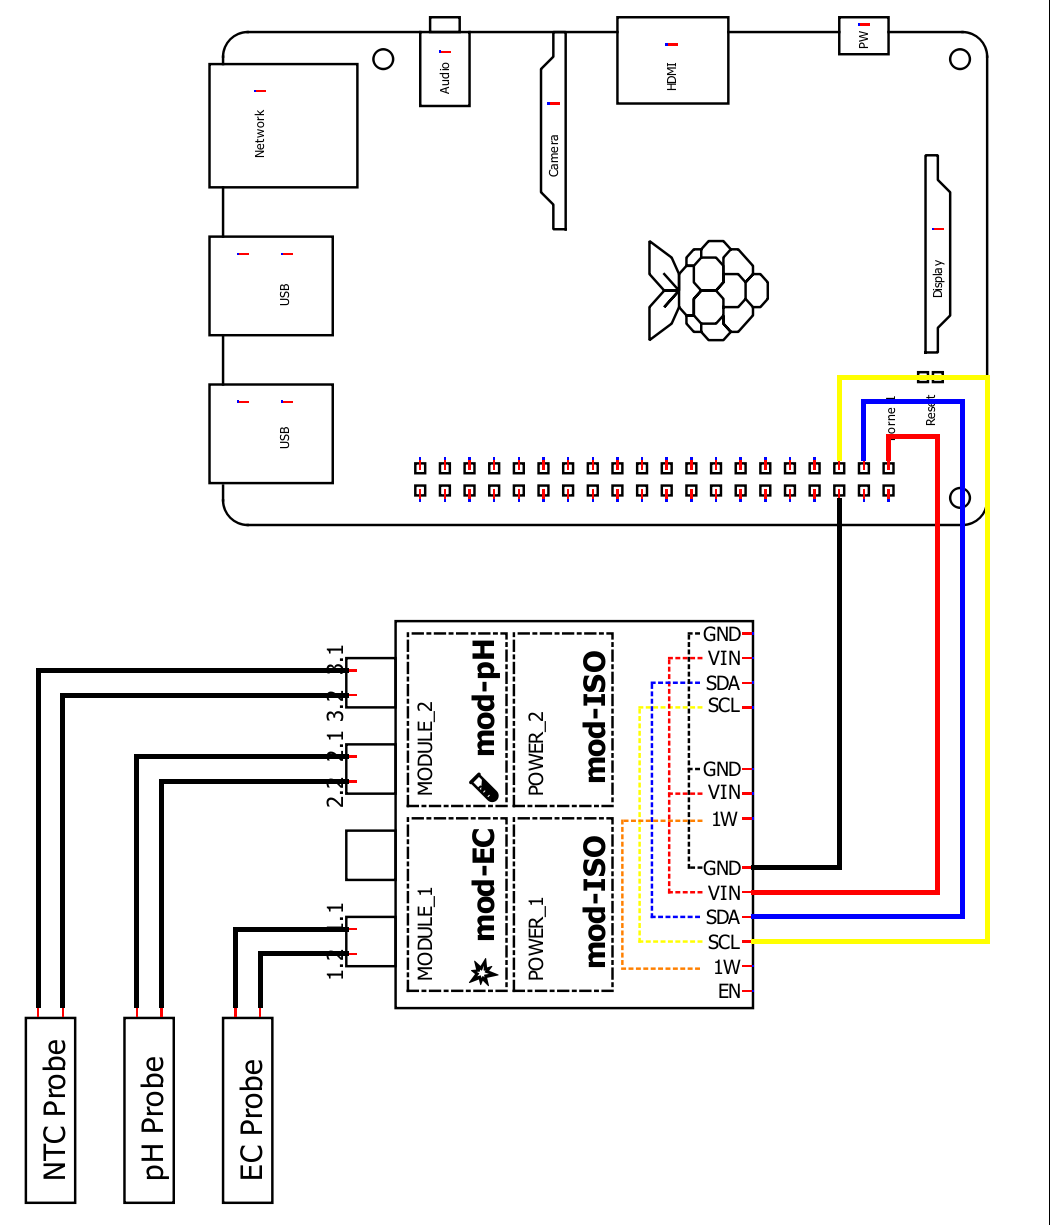
| 1.1 | Provides a connection to the first electrode of an EC probe |
| 1.2 | Provides a connection to the second electrode of an EC probe |
| 2.1 | Provides a connection to the sensing electrode of a pH probe |
| 2.2 | Provides a connection to the reference electrode of a pH probe |
| 3.1 | Provides a connection to either wire of the NTC |
| 3.2 | Provides a connection to the other wire of the NTC |
- all same-name pins are internally connected
- SDA/SCL/1W pins are pulled HIGH through a 4k7 Ohm resistor
- EN pin is pulled low through a 4k7 Ohm resistor
Wiring to a host controller
1.
🔽 Install Arduino IDE
Install the Arduino IDE
2.
📦 Install the libraries
Start the Arduino IDE, press the Sketch menu, and then Include Library > Manage Libraries. Search for and install Microfire_Mod-EC, Microfire_Mod-pH, and Microfire_Mod-NTC.
3.
🔢 Code
Create a new sketch and copy/paste the following code.
#include <Microfire_Mod-EC.h>
#include <Microfire_Mod-pH.h>
#include <Microfire_Mod-NTC.h>

Microfire::Mod_EC::i2c ec;
Microfire::Mod_pH::i2c ph;
Microfire::Mod_NTC::i2c ntc;

void setup()
{
    Serial.begin(9600);
    Wire.begin();
    ec.begin();
    ph.begin();
    ntc.begin();
}

void loop()
{
    ntc.measureTemp();
    ec.measureEC(ntc.tempC);
    ph.measurepH(ntc.tempC);

    Serial.println((String)"mS: " + ec.mS);
    Serial.println((String)"pH: " + ph.pH);
    Serial.println((String)"tempC: " + ntc.tempC);

    delay(1000);
}
4.
➡️ Upload the code
Pick the board and port, then Upload the code.
5.
🔎 View the output
Open the Serial Monitor, measurements should be displayed in the monitor, with updates every second.
This example YAML is very similar to using the individual components. Ensure the board, wifi and i2c sections are correct.
There are some minor differences:
- for mod-EC and mod-pH, the
update_interalis set to never - for mod-EC and mod-pH, a
temperature_sensoris passed to provide them with the temperature data coming from the mod-NTC sensor - when mod-NTC updates, mod-EC and mod-pH are updated. This ensures they take measurements with current temperature data
substitutions:
  friendly_name: Microfire pH+EC+Temp
  device_name: microfire-ph-ec-ntc
esphome:
  name: microfire-ph-ec-ntc
esp32:
  board: esp32dev
  framework:
    type: arduino
logger:
api:
ota:
wifi:
  ssid: !secret wifi_ssid
  password: !secret wifi_password
captive_portal:

# import the components
external_components:
  - source:
      type: git
      url: https://github.com/u-fire/ESPHomeComponents/

# https://esphome.io/components/i2c.html
i2c:
  sda: 21
  scl: 22

sensor:
  - platform: mod_ntc
    id: water_temp
    name: Temperature
    on_value:
      then:
        - component.update: ec
        - component.update: ph

  - platform: mod_ec
    id: ec
    update_interval: never
    name: EC
    temperature_sensor: water_temp

  - platform: mod_ph
    id: ph
    update_interval: never
    name: pH
    temperature_sensor: water_temp

button:
  - platform: template
    id: ec_calibrate_low
    name: EC Calibrate Low 0.5
    icon: mdi:format-vertical-align-bottom
    on_press:
        lambda: |-
          id(ec).calibrateLow(0.5);

  - platform: template
    id: ec_calibrate_mid
    name: EC Calibrate Mid 1.0
    icon: mdi:format-vertical-align-center
    on_press:
        lambda: |-
          id(ec).calibrateMid(1.0);

  - platform: template
    id: ec_calibrate_high
    name: EC Calibrate High 10.0
    icon: mdi:format-vertical-align-top
    on_press:
        lambda: |-
          id(ec).calibrateHigh(10.0);

  - platform: template
    id: ec_calibrate_reset
    name: EC Calibrate Reset
    icon: mdi:restore
    on_press:
        lambda: |-
          id(ec).calibrateReset();

  - platform: template
    id: ph_calibrate_low
    name: pH Calibrate Low 4.0
    icon: mdi:format-vertical-align-bottom
    on_press:
        lambda: |-
          id(ph).calibrateLow(4.0);

  - platform: template
    id: ph_calibrate_mid
    name: pH Calibrate Mid 7.0
    icon: mdi:format-vertical-align-center
    on_press:
        lambda: |-
          id(ph).calibrateMid(7.0);

  - platform: template
    id: ph_calibrate_high
    name: pH Calibrate High 10.0
    icon: mdi:format-vertical-align-top
    on_press:
        lambda: |-
          id(ph).calibrateHigh(10.0);

  - platform: template
    id: ph_calibrate_reset
    name: pH Calibrate Reset
    icon: mdi:restore
    on_press:
        lambda: |-
          id(ph).calibrateReset();

  - platform: factory_reset
    name: Restart with Factory Default Settings
There are more examples for various combinations of sensors/modules on our ESPHomeComponents GitHub repo.
Wiring
1.
📦 Install the libraries
The Python library can installed through pip in a terminal:
pip3 install Microfire-Mod-ECpip3 install Microfire-Mod-pHpip3 install Microfire-Mod-NTC
2.
🔢 Code
Create a python script and run the following sample code.
import Microfire_Mod_EC
import Microfire_Mod_pH
import Microfire_Mod_NTC

ec = Microfire_Mod_EC.i2c()
ph = Microfire_Mod_pH.i2c()
ntc = Microfire_Mod_NTC.i2c()

ec.begin()
ph.begin()
ntc.begin()

ntc.measureTemp()
ec.measureEC(ntc.tempC)
ph.measurepH(ntc.tempC)

print(str("{:.2f}".format(ntc.tempC)) + "°C")
print(str("{:.2f}".format(ec.mS)) + " mS/cm")
print(str("{:.2f}".format(ph.pH)) + " pH")
3.
📒 Documentation
The libraries are documented on their own pages: