mod-NTC
Datasheet
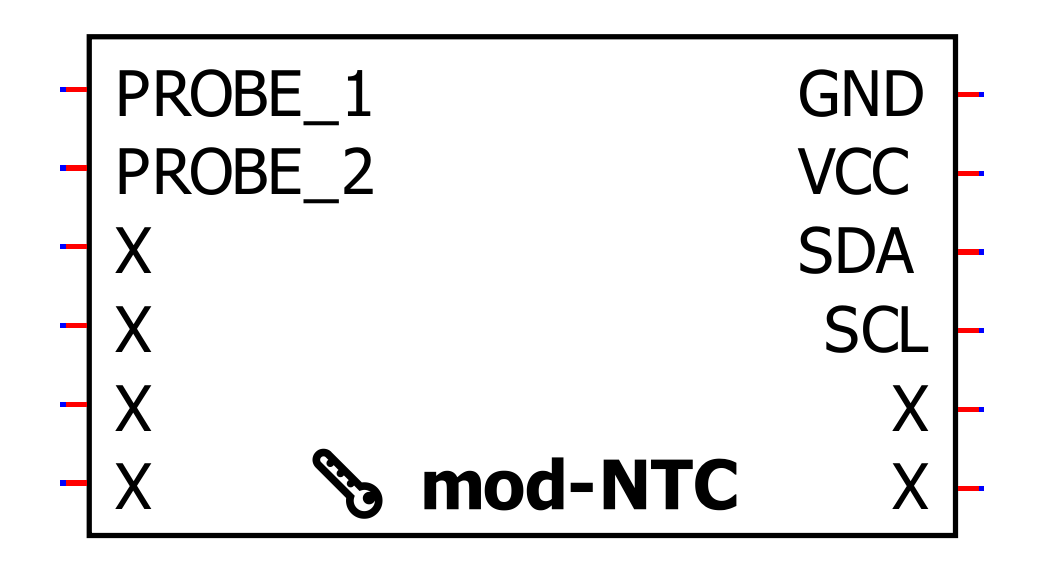
| Pin | Function |
|---|---|
| PROBE_1 | Provides a connection to either wire of the NTC |
| PROBE_2 | Provides a connection to the other wire of the NTC |
| GND | Ground for the module |
| VIN | 3.3-volt power supply |
| SDA | Data line for I²C interface |
| SCL | Clock line for I²C interface |
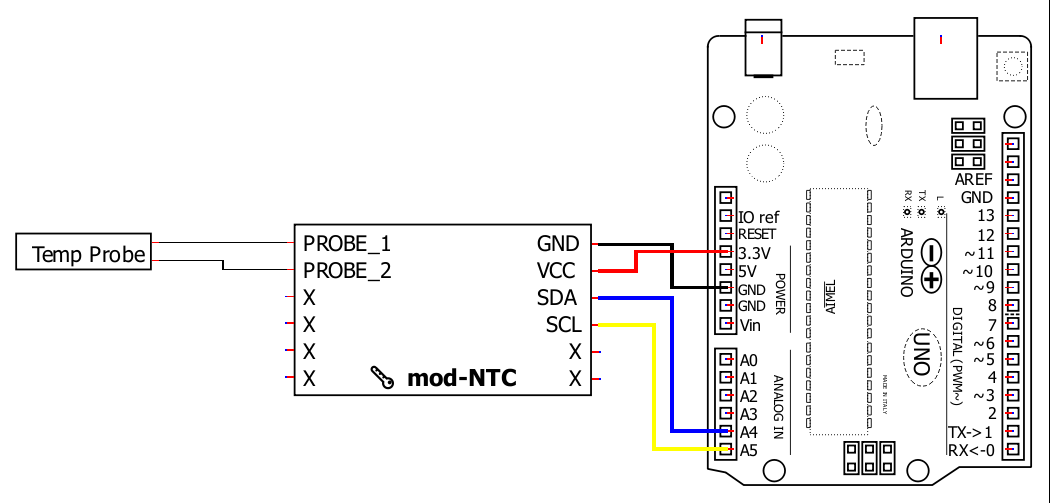
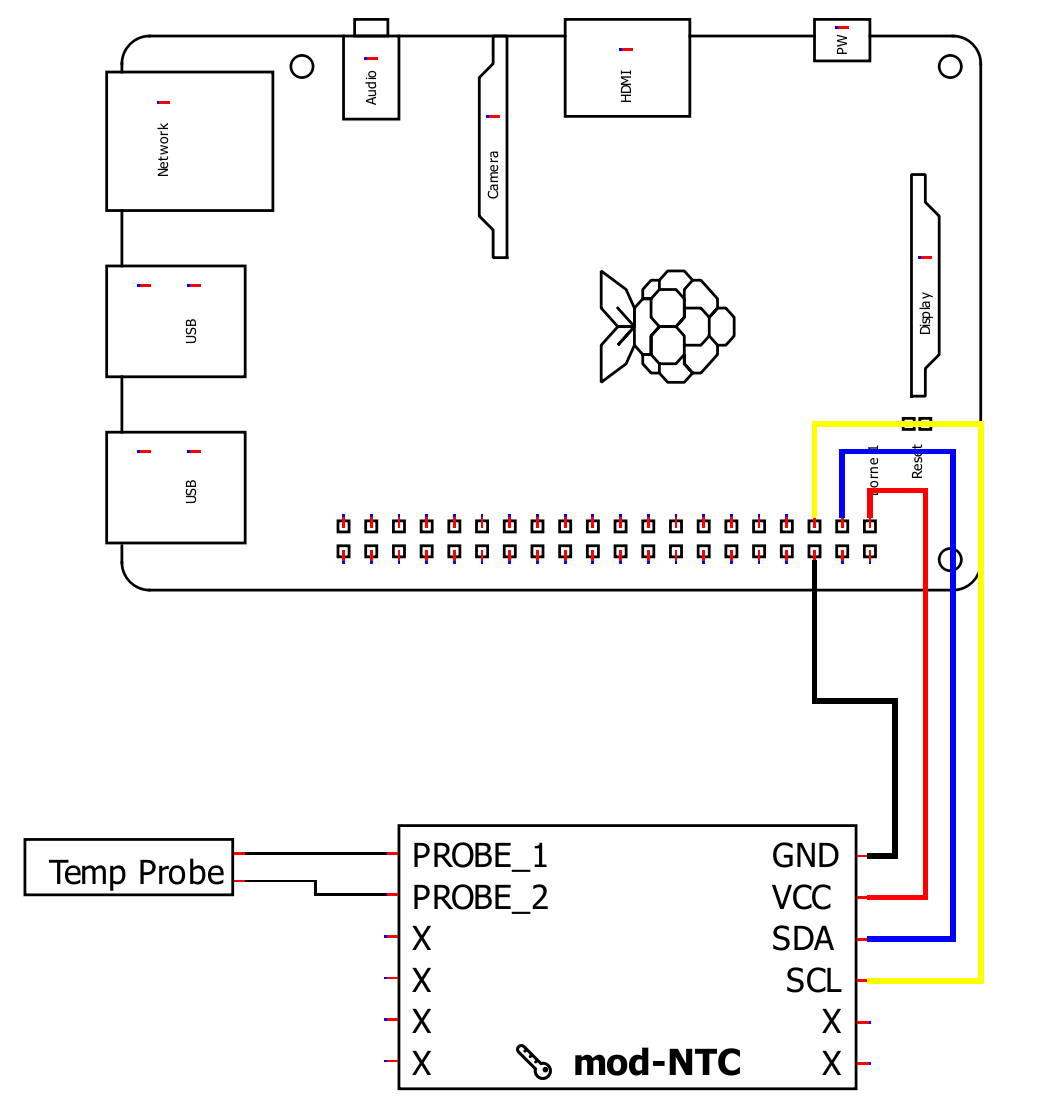
Wiring directly to a host controller
1.
🔽 Install Arduino IDE
Install the Arduino IDE
2.
📦 Install the library
Start the Arduino IDE, press the Sketch menu, and then Include Library > Manage Libraries. Search for Microfire_Mod-NTC and install the library.
3.
🔢 Code
Below is the Basic example. It can be found in File > Examples > Microfire_Mod-NTC > Basic in the Arduino IDE.
#include <Microfire_Mod-NTC.h>
Microfire::Mod_NTC::i2c ntc;
void setup() {
  Serial.begin(9600);
  Wire.begin();
  ntc.begin();
}

void loop() {
  ntc.measureTemp();

  Serial.println((String)ntc.tempC + " °C");
  delay(1000);
}
4.
➡️ Upload the code
Pick the board and port, then Upload the code.
5.
🔎 View the output
Open the Serial Monitor, measurements should be displayed in the monitor, with updates every second.
6.
Documentation
The library is documented here:
1.
📦 Install ESPHome
Follow the instructions on the ESPHome website.
2.
⌨️ Start a project
Type esphome wizard mod-ntc.yaml in the terminal. Make sure the path on the terminal is where you want the project to be. Follow the steps, and there should be a .yaml file in the directory you ran the command in. For this write-up, it will be mod-ntc.yaml. If you type esphome compile mod-ntc.yaml you should see the project compile.
3.
🔢 Code
The YAML file should be changed to the following:
esphome:
  name: microfire-mod-ntc
esp32:
  board: esp32dev
  framework:
    type: arduino
logger:
api:
ota:
wifi:
  ssid: !secret wifi_ssid
  password: !secret wifi_password
  ap:
    ssid: microfire-mod-ntc
    password: !secret wifi_failover
captive_portal:

# import the mod-ntc component
external_components:
  - source:
      type: git
      url: https://github.com/u-fire/ESPHomeComponents/

# https://esphome.io/components/i2c.html
i2c:
  sda: 21
  scl: 22

sensor:
  - platform: mod_ntc
    id: ntc
    name: Temperature
    beta: 3950

button:
  - platform: factory_reset
    name: Restart with Factory Default Settings
This example uses the esp32dev board, make sure to change it as needed. Change the wifi section to your network and password. Check that the i2c section is using the correct pins.
4.
➡️ Upload
Type esphome run mod-ntc.yaml. It will compile the project and ask you which serial device to upload the code to. After that, you’ll see the ESP debug output. If everything goes to plan, you should see a device has been discovered in Home Assistant.
5.
🏠 Home Assistant
From within Home Assistant, press Settings > Devices & Services and find the device in the ESPHome integration box. Click it and then click where it says 1 Device. You should see a screen with all the information, conductivity measurement, and some buttons to calibrate and reset the device. You can create dashboards, scripts, and anything else Home Assistant can do from here.
There are more examples for various combinations of sensors/modules on our ESPHomeComponents GitHub repo.
Wiring
1.
📦 Install the library
This Python library can installed through pip in a terminal:
pip3 install Microfire-Mod-NTC
Typing python3 -m Microfire_Mod_NTC.shell will start the shell application and give access to
all features and functions of the module. Type help to see a listing of the commands available.
2.
🔢 Code
Create a python script and run the following sample code.
import Microfire_Mod_NTC
ntc = Microfire_Mod_NTC.i2c()
ntc.begin()
ntc.measureTemp()
if ntc.status:
  print("Error: " + ntc.status_string[ntc.status])
else:
  print(str("{:.3f}".format(ntc.tempC)) + "°C")
  print(str("{:.3f}".format(ntc.tempF)) + "°F")
  print(str("{:.3f}".format(ntc.tempK)) + "K")
3.
Documentation
The library is documented here: