Mod-NTC for Home Assistant
In this write-up, we will install ESPHome to get NTC temperature measurements into Home Assistant.
- We will be working in a terminal and using a few commands
- You'll need a Home Assistant installation running
- An ESP-device
- A Mod-NTC module and preferably a carrier board
These instructions are for the CLI version of ESPHome. You can also copy and paste the YAML into the ESPHome addon within Home Assistant and avoid the CLI completely.
1.
📦 Install ESPHome
Follow the instructions on the ESPHome2.
🏁 Start a project
Type in the terminal. Make sure the path on the terminal is where you want the project to be. Follow the steps, and there should be a .yaml file in the directory you ran the command in. For this write-up, it will be mod-ntc.yaml. If you type you should see the project compile.3.
🔌 Connections
-
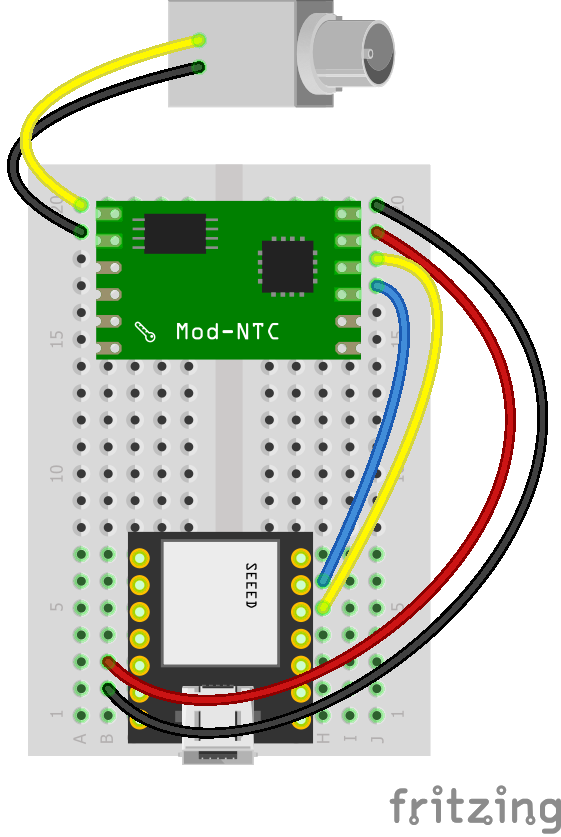 ModuleController
GND ground VCC 3.3 - 5 volt power supply SCL SCL SDA SDA PROBE_1 either probe wire PROBE_2 either probe wire -
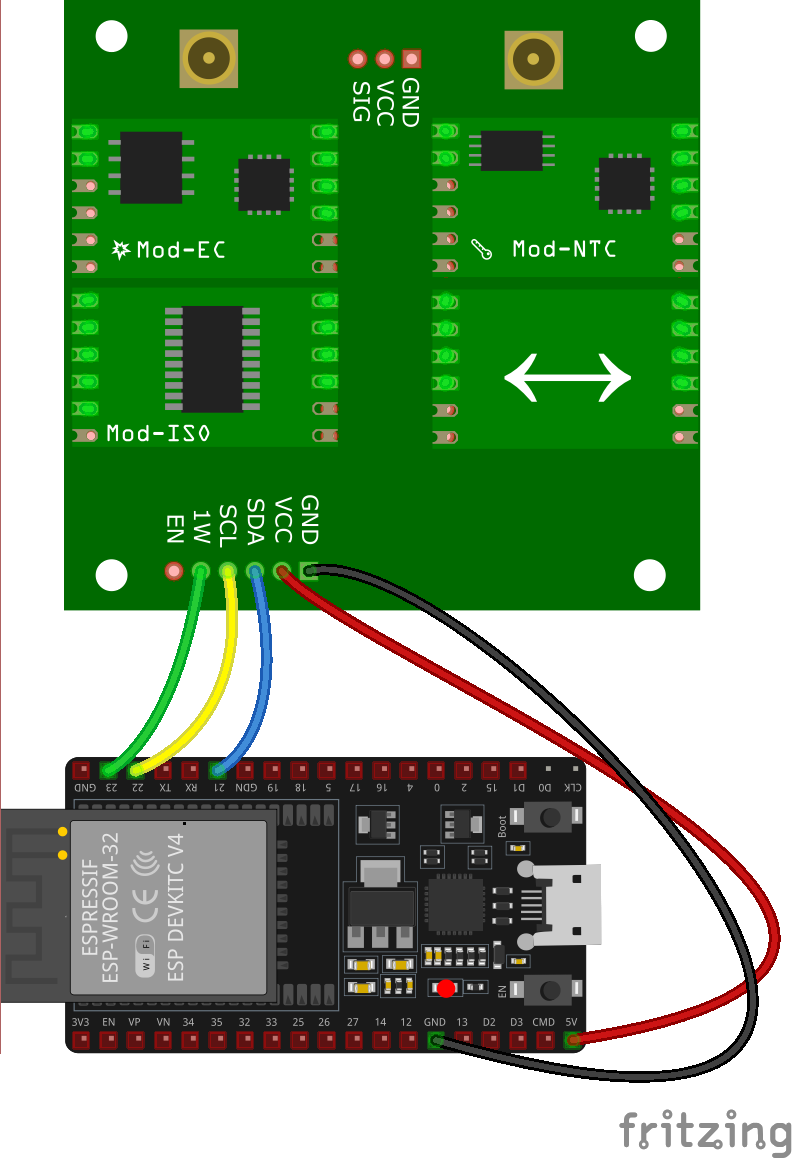 Carrier BoardController
GND ground VIN 3.3 - 5 volt power supply SCL SCL SDA SDA 1W optional 1-wire device signal line EN optional EN wire, drive HIGH to disable both power modules Carrier 1W Header1-Wire SensorGND ground VCC 3.3 - 5 volt power supply SIG signal data line for 1-Wire sensor
Probe connection is made with the SMA connector, using a SMA-BNC Bulkhead or similar.
4.
🔢 Code
We'll use an external sensor component to get the Mod-NTC module working. This is done by adding some lines to the YAML.
The YAML file should be changed to the following:
1 | |
2 | |
3 | |
4 | |
5 | |
6 | |
7 | |
8 | |
9 | |
10 | |
11 | |
12 | |
13 | |
14 | |
15 | |
16 | |
17 | |
18 | |
19 | |
20 | |
21 | |
22 | |
23 | |
24 | |
25 | |
26 | |
27 | |
28 | |
29 | |
30 | |
31 | |
32 | |
33 | |
34 | |
35 | |
36 | |
37 | |
38 | |
39 | |
40 | |
Make sure you change the wifi section to your network and password if you aren't using a secrets.yaml. Check that the i2c section is using the correct pins.
5.
➡️ Upload
Type . It will compile the project and ask you which serial device to upload the code to. After that, you'll see the ESP debug output. If everything goes to plan, you should see a device has been discovered in Home Assistant.
6.
🏠 Home Assistant
From within Home Assistant, press Settings > Devices & Services and find the device in the ESPHome integration box. Click it and then click where it says 1 Device. You should see a screen with all the information, Mod-NTC measurement, and some buttons to calibrate and reset the device. You can create dashboards, scripts, and anything else Home Assistant can do from here.
There is more documentation and examples for various combinations of sensors/modules on our
ESPHomeComponents GitHub repo